
This manual provides comprehensive guidance for adjusting and maintaining Lippert slide-out systems, ensuring optimal performance and longevity. It covers synchronization, manual overrides, and essential safety protocols.
1.1 Overview of the Lippert Slide-Out System
The Lippert Slide-Out System is a versatile and reliable mechanism designed to extend and retract rooms in RVs, enhancing living space. It features an electric slide-out system with a manual override option for convenience. The system includes active and passive slide tubes, with the active tube equipped with a hydraulic cylinder for powered movement. A synchronizing bracket ensures balanced extension and retraction, preventing misalignment. Proper adjustment is crucial for smooth operation, sealing, and structural integrity. This overview highlights the key components and functionality, providing a foundation for understanding the system before diving into detailed adjustments and maintenance procedures.
1.2 Importance of Proper Slide-Out Adjustment
Proper adjustment of the Lippert Slide-Out System is essential for ensuring smooth operation and preventing damage. Misalignment can lead to mechanical stress, causing premature wear on components like tubes and seals. Additionally, incorrect adjustments may result in poor sealing, exposing the RV to weather-related issues. Proper synchronization ensures even movement, reducing the risk of jamming or uneven extension. Regular adjustments also enhance safety by preventing accidental movement during transit. By maintaining precise alignment and functionality, you protect your investment and ensure optimal performance for years to come.
1.3 Safety Precautions Before Adjustment
Before adjusting the Lippert Slide-Out System, ensure the RV is on a level surface and stabilize it with jack stands or wheel chocks. Engage the parking brake and disconnect the power supply to avoid accidental activation. Clear the surrounding area of obstructions to prevent damage or injury. Always refer to the manual override system if electrical controls are inactive. Never attempt adjustments while the slide-out is in motion, as this can cause mechanical failure or personal harm. Wear protective gear, including gloves and safety glasses, when handling tools or components. Ensure all users are aware of the adjustment process to maintain a safe environment throughout the procedure.
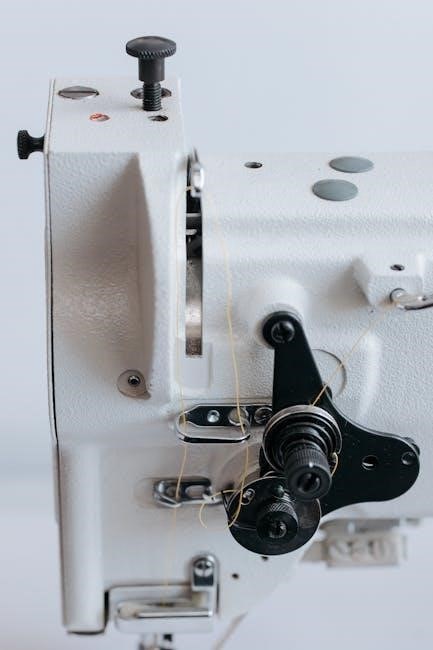
Understanding the Lippert Slide-Out Components
The Lippert Slide-Out System includes active and passive slide tubes, a synchronizing bracket, and an electric actuator. These components work together to enable smooth extension and retraction.
2.1 Key Components of the Slide-Out System
The Lippert Slide-Out System comprises essential components designed for smooth operation. The active slide tube, equipped with a hydraulic cylinder, powers the movement, while the passive slide tube guides it. The synchronizing bracket ensures both tubes move in unison, maintaining alignment. Additionally, the electric actuator provides the necessary force for extending and retracting the room. Other critical parts include the control panel, which manages the system’s operation, and the manual override mechanism for emergency use. These components work together to ensure the slide-out functions reliably and efficiently, providing a seamless experience for users. Proper understanding of these parts is crucial for effective adjustment and maintenance.
2.2 Active vs. Passive Slide Tubes
The Lippert Slide-Out System features two types of slide tubes: active and passive. The active slide tube is powered by a hydraulic cylinder, driving the movement of the slide-out room. It is responsible for initiating and controlling the extension and retraction process. In contrast, the passive slide tube does not have a power source and relies on the active tube for movement. It serves as a guide, ensuring smooth and alignment during operation. The synchronizing bracket connects both tubes, maintaining proper alignment and preventing misadjustment. Understanding the roles of active and passive tubes is essential for troubleshooting and ensuring the system operates efficiently. Proper synchronization between these components is critical for optimal performance.
2.3 Role of the Synchronizing Bracket
The synchronizing bracket plays a crucial role in the Lippert Slide-Out System by ensuring proper alignment and synchronization between the active and passive slide tubes. It connects the two tubes, preventing misalignment during extension and retraction. The bracket is mounted on the passive slide tube and works in tandem with the active tube, which is powered by the hydraulic cylinder. This synchronization is essential for smooth operation and even movement of the slide-out room. Without the synchronizing bracket, the system may malfunction, leading to uneven extension or retraction. Regular inspection and adjustment of the bracket are necessary to maintain optimal performance and prevent wear on the slide-out components. Proper alignment ensures long-term reliability and functionality of the system.
Pre-Adjustment Procedures
Pre-adjustment procedures involve ensuring a level surface, clearing the surrounding area, and engaging the manual override system to facilitate smooth slide-out operation and prevent potential damage.
3.1 Ensuring a Level Surface for Adjustment
Ensuring a level surface is crucial for proper slide-out adjustment. Begin by parking your RV on a solid, even ground to prevent uneven extension or retraction. Use leveling blocks if necessary to stabilize the unit. A bubble level tool can help verify surface evenness. Avoid adjusting the slide-out on uneven surfaces, as this may lead to misalignment or mechanical stress. Once leveled, clear the surrounding area of obstructions to ensure smooth operation. Engaging the manual override system can help lock the room in place during adjustments. Always follow manufacturer guidelines to maintain system integrity and prevent potential damage. Leveling is the foundation for accurate adjustments.
3.2 Clearing the Surrounding Area
Before adjusting the slide-out system, ensure the surrounding area is clear of obstructions. This includes furniture, plants, vehicles, or any items that could interfere with the slide-out’s movement. Clearing the area prevents damage to the RV, the slide-out mechanism, or nearby objects. Additionally, check for overhead obstructions like branches or awnings that could impede the room’s extension. A clear workspace ensures safe and effective adjustments. Once the area is clear, proceed with leveling the RV and engaging the manual override system if necessary. This step is essential for maintaining the integrity of the slide-out system and ensuring smooth operation during adjustments. Always prioritize safety and efficiency in preparation.
3.3 Engaging the Manual Override System
To engage the manual override system, locate the crank extension with the pin outside the chassis main rail. This is typically found underneath the unit or inside the frame, as shown in the manual. Insert the crank handle into the extension and begin turning it clockwise or counterclockwise to extend or retract the slide-out room. Ensure the area is clear before manually operating the system. This feature allows for precise control when adjusting the slide-out position. Always refer to the manual for specific instructions, as the process may vary slightly depending on the model. Proper use of the manual override ensures safe and effective adjustments when needed.
Adjusting the Lippert Slide-Out System
Adjusting the Lippert Slide-Out System involves synchronizing the drive shaft, aligning the room horizontally, and using the manual override for precise control. Follow the manual for smooth operation and proper sealing.
4;1 Manual Override Adjustment Procedure
The manual override system allows for precise control when adjusting the Lippert Slide-Out. Locate the crank extension with a pin outside the chassis main rail. Attach the crank handle, ensuring it is securely connected. To manually extend or retract the slide-out, turn the crank clockwise or counterclockwise. Always maintain proper alignment to avoid damage. After adjusting, ensure the room is fully retracted or extended and stops moving. Release the switch to lock the position. For detailed steps, refer to the manual override section in the user guide. This method ensures safe and accurate adjustments when the automatic system is not functioning.
4.2 Horizontal Alignment Adjustment
Horizontal alignment is crucial for proper slide-out operation. Begin by ensuring the RV is on a level surface. Loosen the lag bolts slightly to allow adjustment. Use a wrench to adjust the position of the slide-out room, ensuring it aligns flush with the RV’s exterior. Tighten the lag bolts progressively to maintain even pressure. After adjustment, test the slide-out to confirm smooth operation and proper sealing. Regular checks and minor adjustments will prevent misalignment issues, ensuring optimal performance and longevity of the system. Always refer to the manual for specific torque specifications and safety guidelines.
4.3 Synchronizing the Slide-Out System
Synchronizing the slide-out system ensures both sides move uniformly. Start by loosening the adjustment bolts on the synchronizing bracket. Extend the slide-out room halfway and check alignment. Adjust the bracket by turning the bolts until the room is flush with the RV’s exterior. Tighten the bolts securely and test the system by extending and retracting the room. Monitor for any binding or uneven movement, making fine adjustments as needed. Proper synchronization prevents mechanical stress and ensures smooth operation. Always refer to the manual for specific torque specifications and alignment guidelines to achieve optimal results. Regular synchronization checks will maintain the system’s performance and longevity.
4.4 Fine-Tuning the Slide-Out Sealing
Fine-tuning the slide-out sealing ensures a watertight and secure closure. After adjusting the slide-out alignment, inspect the seals for proper contact with the RV’s exterior. If gaps exist, adjust the horizontal alignment or synchronize the slide tubes slightly. Apply silicone-based lubricant to the seals to maintain flexibility and prevent cracking. Test the system by extending and retracting the room to verify even pressure and a flush finish. For persistent leaks, check the synchronizing bracket alignment and tighten any loose bolts. Proper sealing prevents water intrusion and maintains the integrity of the slide-out mechanism. Regular inspections and adjustments are crucial for long-term reliability and weatherproofing.

Maintenance and Inspection
Regular maintenance ensures optimal slide-out performance. Lubricate moving parts, inspect for wear, and ensure all bolts are secure. Clean the system regularly to prevent debris buildup and ensure smooth operation.
5.1 Regular Maintenance Checks
Regular maintenance checks are crucial to ensure the longevity and functionality of the Lippert slide-out system. Begin by inspecting the slide-out mechanism for any visible damage or wear. Check the hydraulic cylinders for leaks and ensure all bolts and fasteners are tightened properly. Lubricate all moving parts, such as gears and bearings, to reduce friction and prevent corrosion. Additionally, examine the electrical connections for any signs of damage or corrosion, and ensure they are secure. Clean the slide-out tracks and rollers to remove any debris that may obstruct smooth operation. Perform these checks at least once a month and before long trips to prevent unexpected issues. Regular maintenance not only enhances performance but also extends the life of the slide-out system, ensuring reliable operation for years to come.
5.2 Lubrication of Moving Parts
Lubrication is essential for maintaining the smooth operation of the Lippert slide-out system. Regularly apply a high-quality silicone-based lubricant to all moving parts, such as gears, bearings, and hinges. This reduces friction and prevents corrosion. Use a grease gun for hard-to-reach areas and ensure the lubricant is compatible with the system’s materials. Apply lubricant after cleaning the parts to ensure effectiveness. Repeat this process every 1-2 months, or more frequently if the system is used extensively. Proper lubrication ensures seamless slide-out operation and extends the lifespan of the components. Always refer to the manufacturer’s recommendations for the best lubricants to use on your specific Lippert slide-out model.
5.3 Inspecting the Slide-Out Mechanism
Regular inspection of the slide-out mechanism is crucial for ensuring proper function and preventing potential issues. Start by examining the slide-out stops and head assemblies for proper installation and alignment. Check the mounting hardware for tightness and signs of wear. Inspect the gears, bearings, and hinges for any visible damage or excessive wear. Lubricate moving parts as needed to maintain smooth operation. Additionally, verify that the slide-out is synchronizing correctly between the active and passive tubes. Address any misalignment or damage promptly to prevent further complications. Always refer to the manual for specific inspection steps tailored to your Lippert slide-out model to ensure reliability and longevity.
Troubleshooting Common Issues
Identify common slide-out issues like misalignment or mechanical failure. Adjust synchronizing brackets and hydraulic cylinders for proper alignment. Check electrical connections and consult the manual for detailed solutions.
6.1 Identifying Common Slide-Out Problems
Common issues with Lippert slide-outs include misalignment, mechanical failure, and electrical malfunctions. Misalignment can cause uneven extension or retraction, while mechanical failures often stem from worn or damaged components. Electrical issues, such as faulty switches or sensors, may prevent proper operation. Improper sealing is another frequent problem, leading to leaks or gaps. Regular inspection and maintenance can help identify these issues early. Addressing them promptly ensures smooth functionality and prevents further damage. Always refer to the troubleshooting guide for specific solutions tailored to your system.
6;2 Adjusting the Hydraulic Cylinder
Adjusting the hydraulic cylinder on your Lippert slide-out system ensures proper alignment and smooth operation. Begin by loosening the mounting bolts on the cylinder. Slowly extend or retract the slide-out to the desired position, then tighten the bolts securely. Ensure the cylinder is aligned with the slide-out mechanism to prevent binding. After adjustment, test the system by extending and retracting the slide-out to confirm proper function. If the slide-out does not move smoothly, repeat the process. Always refer to the manufacturer’s specifications for torque values and alignment guidelines. Proper adjustment ensures optimal performance and extends the lifespan of the hydraulic system.
6.3 Resolving Electrical System Malfunctions
Diagnosing electrical issues in the Lippert slide-out system is crucial for reliable operation. Start by checking the circuit breaker or fuse box to ensure power is restored. Inspect all electrical connections for corrosion or damage, and clean or replace them as needed. Verify the motor controller is functioning correctly and adjust the control potentiometer if necessary. Use a multimeter to test voltage levels at key components, ensuring they match specifications. If the system operates on low voltage, consult the manual for adjustments. Finally, test the slide-out function after each repair step to confirm resolution. Always follow safety guidelines when working with electrical systems to avoid hazards. Proper troubleshooting ensures efficient and safe operation of your Lippert slide-out system.
Advanced Adjustment Techniques
Advanced techniques involve precise calibration of the motor and gear system, optimizing drive shaft synchronization, and fine-tuning slide-out performance for enhanced reliability and smooth operation.
7.1 Adjusting the Drive Shaft Synchronization
Drive shaft synchronization ensures both active and passive slide tubes move in unison. Begin by loosening the set screws on the synchronizing bracket. Rotate the drive shaft to align the active and passive tubes. Tighten the set screws once alignment is achieved. Test the system by extending and retracting the slide-out to verify smooth operation. Small adjustments may be needed to achieve perfect synchronization. Always refer to the manual for specific torque specifications and safety guidelines during this process.
7.2 Calibrating the Motor and Gear System
Calibrating the motor and gear system ensures precise operation of the slide-out mechanism. Start by engaging the manual override to fully extend or retract the room. Locate the calibration switch on the motor control unit and press it until the system resets. Next, cycle the slide-out three times to synchronize the motor and gear. Check for smooth movement and proper alignment. If adjustments are needed, refer to the manufacturer’s instructions for torque specifications and alignment procedures. Proper calibration is crucial for maintaining the longevity and efficiency of the Lippert slide-out system.
7.3 Optimizing Slide-Out Performance
Optimizing slide-out performance involves regular maintenance and fine-tuning. Start by lubricating all moving parts to ensure smooth operation. Check the alignment of the slide-out with the RV’s frame to prevent uneven wear. Power cycle the system to reset the motor and gear synchronization. Inspect the gear teeth for wear and replace them if necessary. Adjust the torque settings on the motor according to the manufacturer’s specifications. Finally, test the slide-out by extending and retracting it multiple times to ensure seamless functionality. Proper optimization enhances durability and ensures reliable operation of the Lippert slide-out system.

Additional Resources and References
For further assistance, refer to the official Lippert website for detailed manuals, troubleshooting guides, and customer support contact information to ensure optimal slide-out system performance.
8.1 Lippert Slide-Out System User Manuals
The Lippert Slide-Out System User Manuals are essential resources for understanding and maintaining your slide-out mechanism. These manuals provide detailed instructions for installation, adjustment, and troubleshooting, ensuring optimal performance. They include diagrams and step-by-step guides to help users navigate complex procedures. Key topics covered include synchronizing the slide-out system, manual override operations, and routine maintenance checks. The manuals also emphasize safety precautions to prevent accidents during adjustments. By referring to these documents, users can resolve common issues and ensure their slide-out system functions smoothly. For access, visit the official Lippert website or contact their customer support team for the most up-to-date versions tailored to your specific model.
8.2 Online Troubleshooting Guides
Online troubleshooting guides for the Lippert Slide-Out System are invaluable for diagnosing and resolving common issues. These resources, available on the Lippert website, provide step-by-step solutions for problems like misalignment, hydraulic malfunctions, and electrical system errors. They often include detailed diagrams and videos to aid in understanding complex procedures. Users can find guidance on synchronizing slide-out systems, adjusting cylinders, and addressing seal leaks. Additionally, these guides offer tips for optimizing performance and maintaining the system. Many guides are interactive, allowing users to input specific symptoms for tailored solutions. By leveraging these online tools, RV owners can efficiently troubleshoot and repair their slide-out systems without requiring advanced technical knowledge. Accessing these guides is straightforward, ensuring quick resolution to common challenges.
8.3 Contacting Lippert Customer Support
For personalized assistance with your Lippert Slide-Out System, contacting customer support is a reliable option. Lippert provides dedicated support through their official website at www.lci1.com/customerservice. Users can also reach out via phone by calling their toll-free number, 1-800-LIPPert (1-800-547-7378), for direct technical guidance. Additionally, email support is available at techsupport@lippert.com. The support team is well-trained to address issues such as synchronization problems, hydraulic adjustments, and electrical malfunctions. They also offer troubleshooting tips and can provide replacement parts if needed. Lippert’s customer support operates Monday through Friday, from 8 AM to 5 PM EST, ensuring prompt resolution for any slide-out-related queries. This resource is essential for resolving complex issues beyond basic troubleshooting.
Proper adjustment and maintenance ensure long-term reliability. Always follow safety protocols, use correct tools, and consult the manual. Regular inspections prevent malfunctions and ensure smooth operation.
9.1 Summary of Key Adjustment Steps
The Lippert Slide-Out Adjustment Manual emphasizes synchronizing the slide-out system for smooth operation. Start by ensuring the unit is on a level surface and clear of obstructions. Use the manual override system if needed, locating the crank extension and pin for precise control. Adjust the synchronizing bracket to align the active and passive slide tubes, ensuring proper movement. Lubricate moving parts regularly to maintain efficiency. After adjustments, test the system by extending and retracting the slide-out to confirm proper alignment and sealing. Always follow safety guidelines, such as wearing protective gear and ensuring the area is clear. Regular maintenance and inspections are crucial for long-term reliability. Consult the manual for troubleshooting and advanced techniques if issues arise.
9.2 Ensuring Long-Term Slide-Out Reliability
For long-term reliability, regular inspections and maintenance are essential. Ensure all moving parts are well-lubricated to prevent wear and tear. Store the RV in a dry, protected environment during off-seasons to avoid rust and corrosion. Avoid extreme temperatures and humidity, as they can affect the system’s performance. Always use the manual override system gently to prevent damage to the motor or gears. Avoid overloading the slide-out room, as this can strain the mechanism. Finally, follow the manufacturer’s guidelines for power management and avoid using the system in conditions beyond its design specifications. These practices ensure your Lippert slide-out system remains reliable for years to come.